
One of the great features of SongwritersdB is the three-location backups of your recordings. No more lost files!
- The second you click Save on a new recording, it is saved to your local drive.
- When you click Sync Manually on the Sync Settings page, it is also saved to an app-created folder (“songwritersdB”) on your cloud drive.
- And when you create a backup (see below), a third copy of your song is saved as part of the backup file.
Setting Up Cloud Drive Backups
To be sure the backup feature will work properly, you first must set up the connections to a cloud drive.
If you do not yet have a Google Drive account, click here to create a new account.
Then:
- Click Create account
- Choose For my personal use or For work or business
- Follow the prompts
Once the account is set up:
- Click “Cloud Drive” in the left menu.
- Click the “Connect” button for Google Drive.
- Select your personal Google Drive account.
- Click “Continue” to complete the connection.
- You should now be connected to Google Drive.
Backups: Automatic backups will be made by the program if you select auto backups on the Data Backup/Restore page (within the Cloud Drive section). In addition, at any time, you can create a backup manually that will backup your entire song database, including all songs, Albums, and associated data, to your cloud drive.
To do so, click the Cloud Drive icon in the main left menu, then click the”Data Backup/Restore” tab:
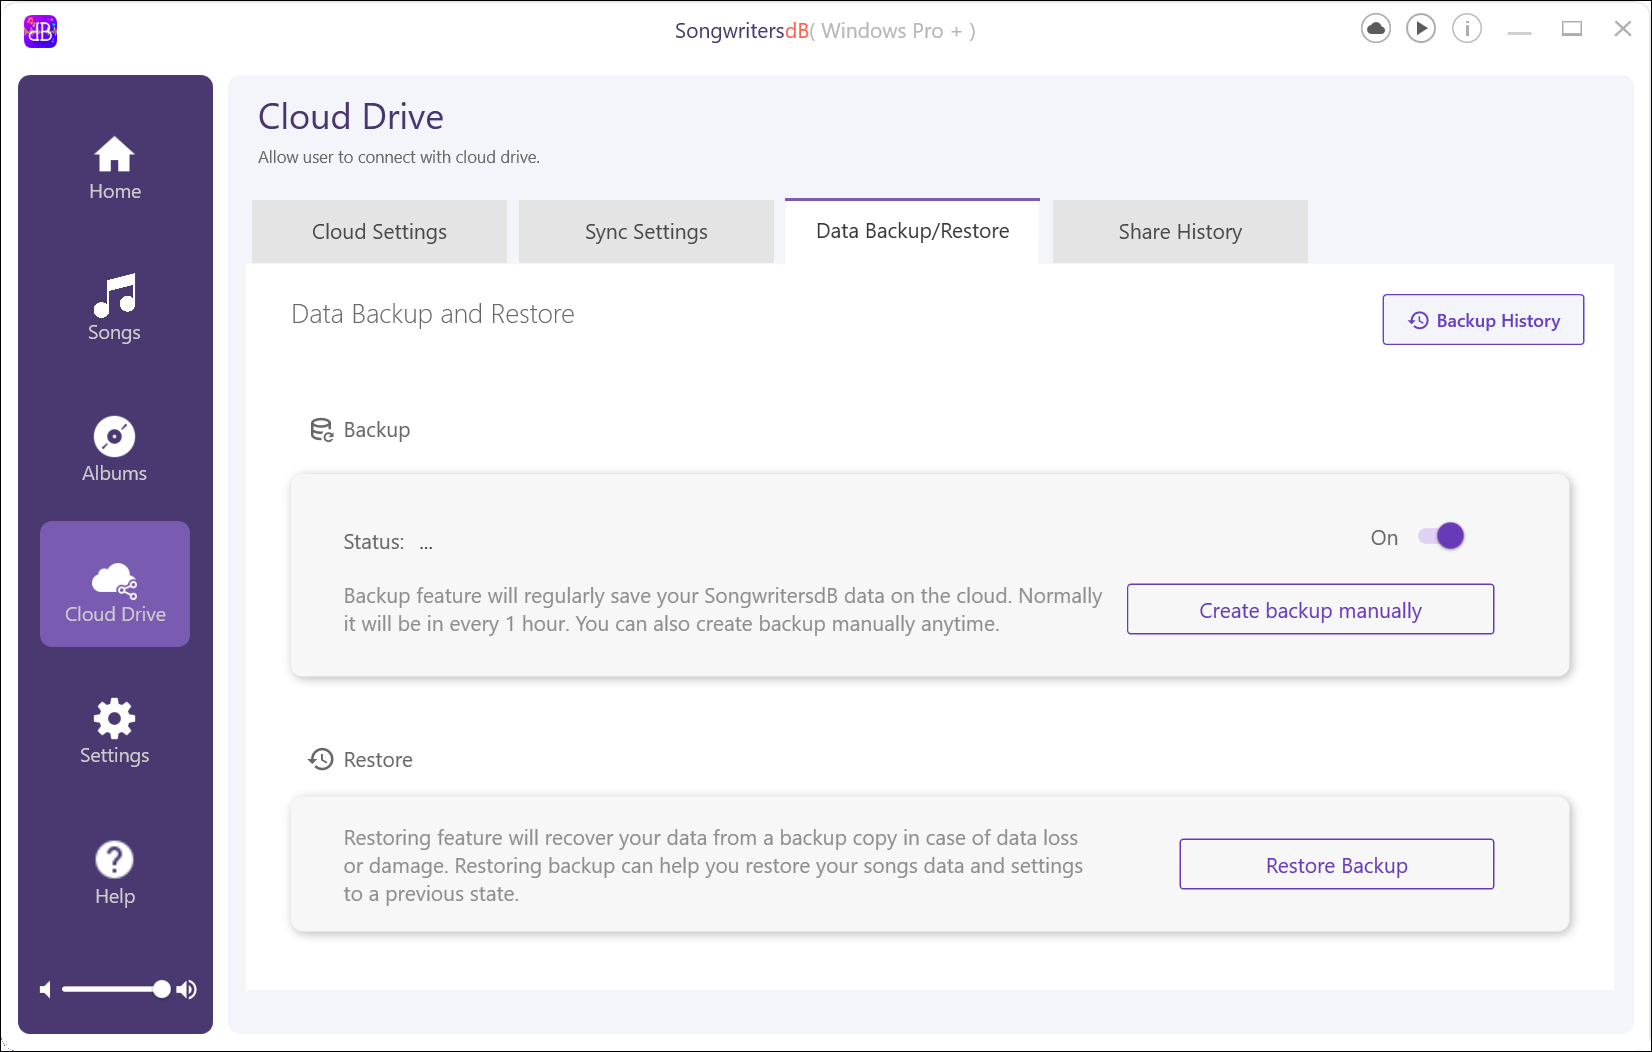
Click “Create backup manually.” The app will now start to back up any newly added songs since the last backup, to an app-created folder (named “[cloud drive]/SongwritersdB/data”).
To restore your backup, click “Restore Backup” on the “Data Backup/Restore” page. After the restore process has completed, the program will close and reopen, and your backup will have been restored.
Multiple Backups (Pro+)
When you click “Create Backup Manually”, a pop-up will appear asking you to enter a file name. You can simply name it “Backup 1”, “Backup 2”, etc., but we recommend using a more descriptive name, e.g., “200 songs”, “Smith 2025 Album project”, “Songs 2011-2021”, etc. After clicking “Save”, the backup will be created as a zip file, and saved here: [cloud drive]/SongwritersdB/data.
To restore a backup, click “Restore Backup”. The “Backup History” pop-up will open. Click the restore-backup icon next to the file you wish to restore:
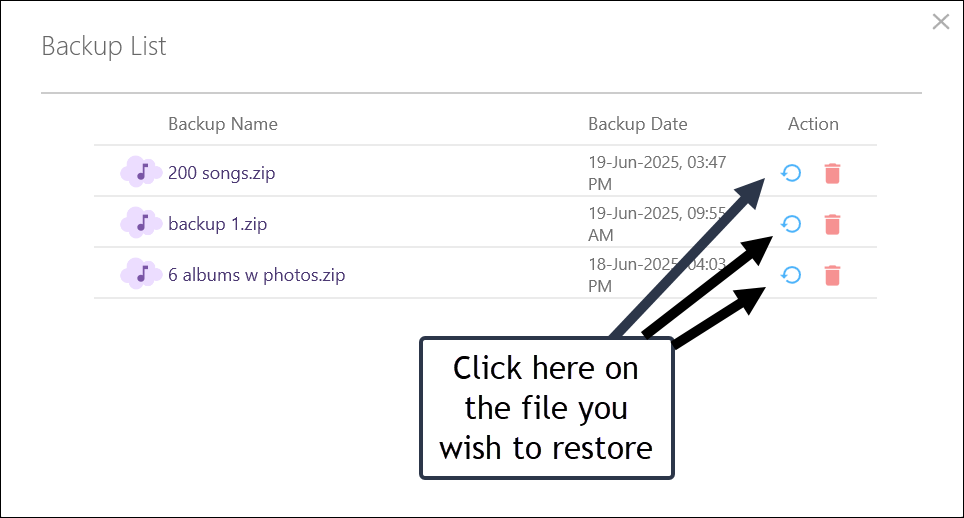
After the restore process has completed, the program will close and reopen, and your selected backup will have been restored.
For additional safety, it is good practice occasionally to make copies of the backups and save them in a separate folder. Just browse to the [cloud drive]/SongwritersdB/data folder and copy your backup zip files to a different location. This way, should the drive fail or otherwise become corrupted, all you would need to do would be to reinstall SongwritersdB, copy the externally saved backup zip folder(s), and restore the backup file.
When you might want to have multiple backups:
There are times when you might want to work on a certain set of songs only, and not be distracted by your other songs. You may want to search only within this group of songs. In such a case, you can do an advanced search to exclude this group of songs then do a “select all” and delete all the remaining songs; or do a “select all” and uncheck all the songs you want to work with, then delete all the remaining songs. Or delete all songs then import a folder of songs you want to work with. In all of these cases, you will be left only with the desired group of songs. At this point, make a backup and name it with a relevant name. Now you have a backup that you can restore at any point, which will just display the set of songs you want to work with and nothing else.