
Recording a New Song
Before you record, go to Settings & More, then AppSettings, and select your input (microphone) and output (speakers).
To record a new song, there are two methods:
Method #1 of Recording a New Song
-
- From the Home page, click the red “New Song” button on the right. This takes you to a page named “Add New Song .”
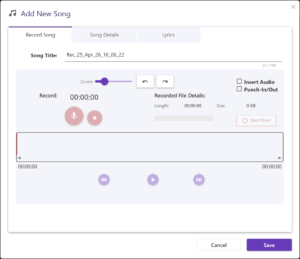
- SONG TITLE: Type in whatever name you’d like in the box next to “Song Title.” If you’d prefer to add a name later, a default song name will be attached to your recording, consisting of the date and time of the recording, e.g., Rec_11_Apr_25_14_23_52, which means “Recorded on April 11, 2025, at 2:23 and 52 seconds, p.m.”
- Be sure you have selected your microphone and the speaker or headphone output from the dropdown menus on the Settings page.
- RECORD: Finally, click the red button with the microphone icon. This will immediately begin your audio recording.
- PAUSE: To pause your recording, click the same button, which is now showing two vertical bars. Re-clicking that button will resume recording from where you paused.
- STOP: Clicking the little square in the red circle will STOP the recording and you will then notice on the right, in the section headed “Recorded File Details,” an indication of the song’s length in minutes and seconds and its file size.
- START OVER: If you want to replace what you just recorded, click the START OVER button all the way on the right. This will erase your existing recording, allowing you to click Record again to start another audio recording.
- PLAY: After clicking “Stop,” you can listen back to what you just recorded by pressing the Play button below or pressing the space bar.
As you listen to the playback, the Play button will change to a Pause icon. Pressing the Pause button will pause the playback and allow you to re-record all audio from that point forward (see paragraph 10, below). - ADDING NEW AUDIO:
-
- For adding audio to the end of an existing recording or at some point before the end:
-
- Play your recording.
- Click Pause at the point where you want to start the new audio.
- Method #1: Click Record to start recording new audio, which will be added to the end. Press Stop when you are finished recording.
-
- Method #2: Tick the checkbox by Punch-in/Out. Use control/left-click to set a marker at or near the end. Place the cursor a little before the marker and click Play (or press the spacebar). When the playhead crosses the marker, it will start recording audio, replacing everything from that point in the recording, forward. Press Stop when you are finished recording.
- SAVE: When you are satisfied with your complete recording, click the SAVE button at the bottom of the Add New Song window, to save your audio file. This will also take you back to the Songs page.
- Method #2: Tick the checkbox by Punch-in/Out. Use control/left-click to set a marker at or near the end. Place the cursor a little before the marker and click Play (or press the spacebar). When the playhead crosses the marker, it will start recording audio, replacing everything from that point in the recording, forward. Press Stop when you are finished recording.
-
- For adding audio to the end of an existing recording or at some point before the end:
-
- From the Home page, click the red “New Song” button on the right. This takes you to a page named “Add New Song .”
Method #2 of Recording a New Song
-
- Click “Songs” in the left menu of the home page.
- Click “New Song” in the upper right corner of the page. This takes you to a page named “Add New Song”.
- Proceed as outlined above, starting with step #2.
Adding Just Lyrics or Title Ideas
-
- From the Home page, click the orange “New Lyrics” button on the right. (You can also click “Songs” in the left menu of the home page, then click “New Song” in the upper right corner of the page.) This takes you to a page named “Add New Song .”
- Titles: To add just a title idea, replace the default date in the Song Title field and click “Save”. Now you will have a blank song tile with just a new title. Another option is to save a song named “Title ideas” and add your new title ideas to the Lyrics page of this song.
- Lyrics: To add just some lyrics or lyric ideas, click the “Lyrics” tab, type in your lyrics or lyric ideas, and click “Save.” Note that the song will be saved with the date and time as the title; to avoid that, type in a word or two in the Song Title field before–or after–you click over to the Lyrics tab, but in any case before you click Save. Of course, you can always edit the Song Title later, but a brief title related to the lyric may help you find the song faster later on. Back on the Songs page, adding a few comments to your just-written lyric may also help you locate the lyric later, when perhaps you can’t remember the exact words used.
Later on, you can do a search for songs with ONLY lyrics or ONLY titles (see “Search Options,” below). Then you can scan the titles for ideas (like a “title book”) or switch over to “Lyrics View” (see “Song Display Options,” below) to scan your unfinished lyrics (or completed lyrics that need music).