
SongwritersdB also includes a FREE remote recording app for your iPhone/iPad or Android phone!
To get the app, go here for an iPhone or here for an Android phone, or simply use your iPhone or Android phone to scan the below QR code, then install the app on your phone.

While the app is free for all to use, note that only Pro/Pro+ users will have the ability to sync automatically to the desktop version.
To see a short video demonstrating how to record and upload audio (and, in Pro+, lyrics also), click the Help icon on the left menu of the desktop app, then click Getting Started.
SYNC WITH DESKTOP APP. Once you have recorded or entered lyrics, you will need to sync to the desktop or you will only have local files. To connect, go to the Setup page (gear icon). Click the “Sign In” button and connect to Google Drive with the same account used in the desktop version.
RECORDING OPTIONS: Tap the music note icon at the bottom of any page to get to the audio recording page:
To begin recording, tap Record (the microphone icon) near the bottom of the screen. When you are done recording, or wish to pause the recording, tap the Pause icon. This will cause a new section to appear:
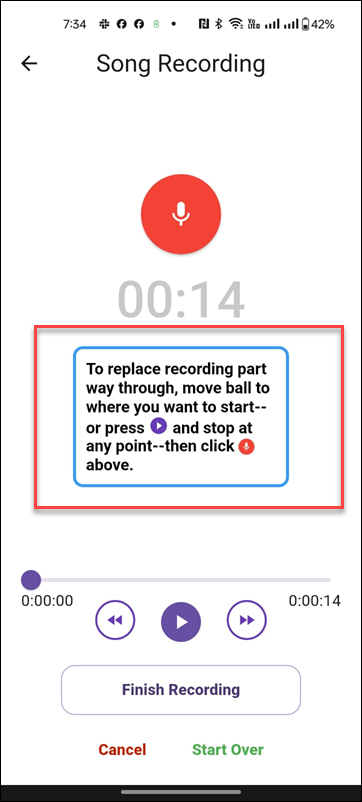
If you wish to audition what you just recorded before saving, tap the Play icon.
-
- If you wish to replace your entire recording, tap Record once more–or tap Start Over–and record your new audio. This can be repeated as often as necessary until you hear your song the way you want it.
- If you wish to add additional audio at the end of what you just recorded, tap the Go to End icon–or move the little ball all the way to the right–then tap Record.
- If you wish to replace your audio starting partway through, either tap Play and then Pause at the point where you wish to begin the new audio, or move the ball to the position where you wish to begin recording the new audio. Then press Record, and the new audio will replace the audio you recorded from that point on.
- Example: Song is two minutes long. You listen to the song and tap Pause at the one-minute mark. You tap Record and record new audio. On playback, you will hear the first minute of your song followed by your new recording: you will have erased the original recording from the one-minute point to the end.
- Once you are satisfied with your recording, tap Finish Recording.
- If you are not connected to the internet, click Save, and your audio will be saved locally to your phone’s drive. If you are already connected to the internet, your song will be saved automatically.
- Click OK. This takes you to the Quick Details page, where you can change the default name. (If you already connected to a cloud drive, your song will be saved upon pressing Finish Recording.)
- If you wish to replace your entire recording, tap Record once more–or tap Start Over–and record your new audio. This can be repeated as often as necessary until you hear your song the way you want it.
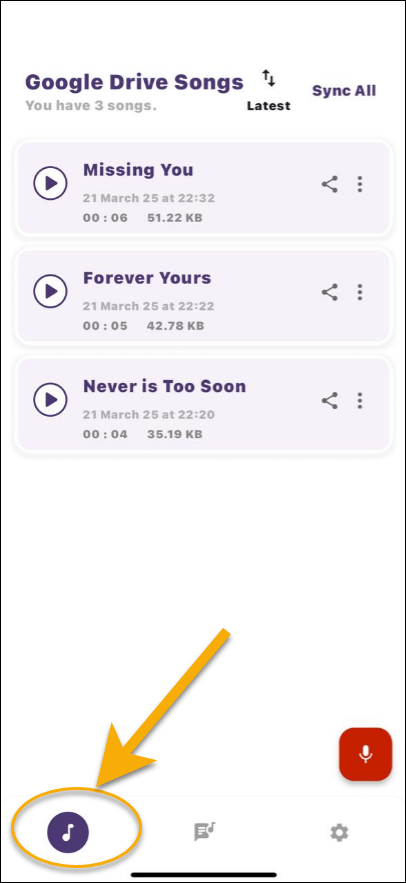
LOCAL SONGS PAGE: After you save a song, tap the back arrow to get to the Google Drive Songs page. Here you can see all the songs you have recorded with the SongwritersdB Aux app. You can tap Play, tap the Share icon to share the audio with a friend or collaborator, or tap the song tile anywhere to return to the Quick Details page for that song.
Sync All will upload all of your phone-recorded songs to your cloud drive (Google Drive). Once within your cloud drive, your songs will be downloaded to the SWDB desktop (via its Manual or Auto Sync). Remember to use the same cloud drive for both phone and desktop!
Song Details: Here you can see the song file info (format, length, size, date recorded) and also rename the song (by touching the title), Sync to the desktop, Share, or delete the audio entirely.
NAMING SONGS: To remind you of the subject of a new song, we recommend that when you first see the Song Details page with the Song Title, you immediately change the default file name (date and time of the recording) to a name that relates to the song. Later tapping Sync All will upload to your designated cloud drive all unsynced songs with the names displayed on your phone.
If you change the name of a song on your phone AFTER you have tapped Sync All, it will change the name displayed on your phone, but it will not change the name of the song within the desktop. (This is to prevent the creation of duplicate song titles with the same audio.) When you get back to your desktop, you can update the song name to match the name on your phone, if you want.
Existing Lyrics. If you save a new song (audio) with the exact same title as an existing lyrics-only song (matching the capitalization and spacing), it will be added to the same-named song tile. If the title is new, then a new song tile will be created to hold the new title and audio.
DELETING SONGS: There are two ways to delete songs from your phone: (i) tap on the song name then tap “Delete” at the bottom of the page to delete only that song, or (ii) tap Remove All Songs at the bottom of the Settings page to delete all the songs on your phone (within the app). In all cases, the songs are deleted only from your phone , and will still appear within the desktop. This is done so that you can clean up the songs on your phone without worrying that you have inadvertently deleted them permanently: they will still be in the cloud and–after syncing–also within the desktop app.
WRITING LYRICS (Pro+ only): You can type in lyrics (or dictate them: see the Lyrics section, above, for instructions) and (i) save as a new song or (ii) add to an existing song. The key is in the TITLE: If you save a new lyric with the exact same title as an existing song (matching the capitalization and spacing), it will be added at the end of any existing lyrics of the song already on the desktop.
To open a new page for lyrics, tap the Lyrics icon in the middle of the bottom of any page. You will see this:
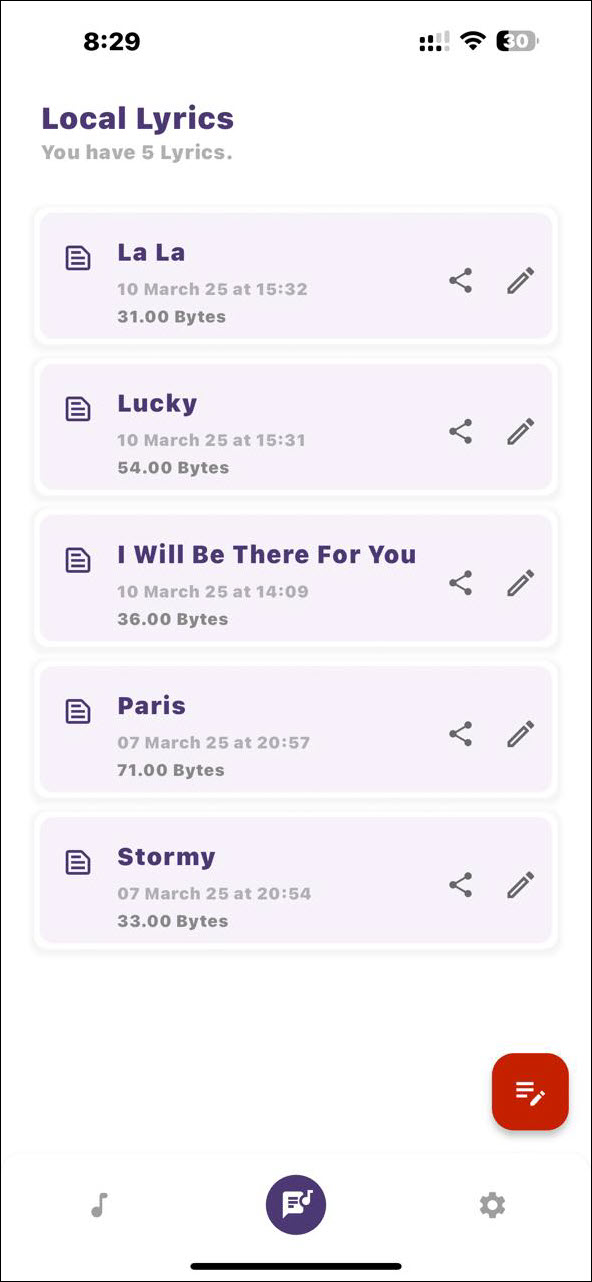
To start a new lyric, tap the red “write lyrics” icon, just above the gear icon. This will open a blank page, where you can enter the song title and type (or dictate) your lyrics. Click Save Changes to save your drafts. When complete, tap the back arrow at the top of the page, then OK. This brings you back to the Local Lyrics page; if you already connected to the cloud, this page will instead show “Google Drive Lyrics”.
SYNC WITH DESKTOP APP: Assuming you have signed into Google Drive (see above), go back to the lyrics page (now called Google Drive Lyrics), and click Sync All. Do the same on the Songs page. These steps will guarantee that all your locally created audio and lyrics will be able to be downloaded the next time you sit down in your home and click Manual Sync on your desktop/laptop version of SongwritersdB.
DELETING LYRICS: There are two ways to delete lyrics from your phone: (i) tap on the song name on the Lyrics page then tap “Delete” at the bottom of the page to delete only that song, or (ii) tap Remove All Lyrics at the bottom of the Settings page to delete all the lyrics on your phone (within the app). In all cases, the lyrics are deleted only from your phone , and will still appear within the desktop. This is done so that you can clean up the lyrics on your phone without worrying that you have inadvertently deleted them permanently: they will still be in the cloud and–after syncing–also within the desktop app.
The songs uploaded from the phone during Sync will be located here within your Google Drive: MyDrive/SongwritersdB/Mobile Songs.
SETTINGS PAGE: Tapping the gear icon at the bottom of any page takes you to the Settings page, where you can review your total songs data, remove all songs and/or lyrics from the app displays, sign out from your cloud drive, find where your songs are located on your phone, and find links to all SongwritersdB social media and video tutorials.
——————————————-
USE OF THIRD-PARTY VOICE RECORDER APPS: There are many other voice recorder apps available for iPhone/Android, some with sophisticated editing capabilities. If you prefer to use one of those instead of SongwritersdB Aux, you can certainly do so, as long as the audio file is saved to the same cloud drive as is used for SongwritersdB desktop.
Google Drive: After you have connected your desktop version to Google drive and completed at least one Sync Manually operation, look for a folder within the MyDrive folder named SongwritersdB/Mobile Songs. This is the folder you need to point your third-party voice memo app toward, so new recordings are added to this folder. Then, once the desktop app is synced with the cloud, all new songs recorded on your phone that are saved in this folder will be imported onto the desktop for adding lyrics, comments, tags, etc.